How to Install Claude Code on Mac (and Build Your First Project)
You can install Claude Code on a Mac in about 10 minutes: through the Claude app with its Code tab, or with one command in Terminal. Below are both paths step by step, the macOS errors and their fixes, and a first project: a one-page website for your service, built by Claude from a short description.
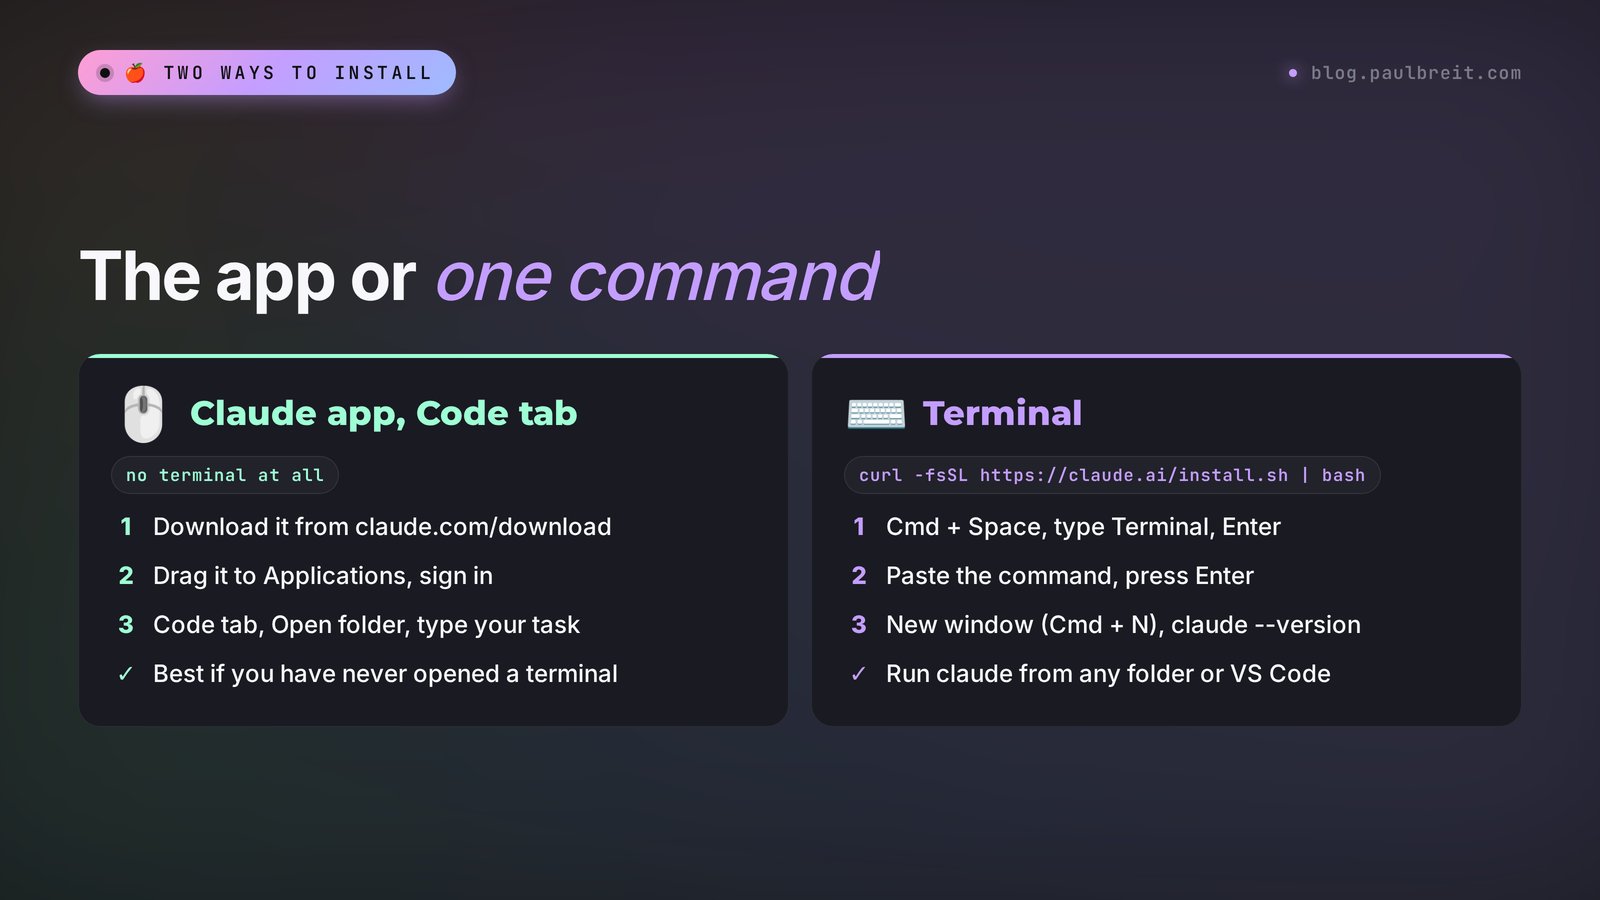
To install Claude Code on a Mac, pick one of two paths. No terminal: download the Claude app, drag it to Applications, and open the Code tab. With Terminal: paste curl -fsSL https://claude.ai/install.sh | bash, then check it with claude --version. You need macOS 13 Ventura or newer and a paid plan from $20 a month.
What's inside
- Two ways to install Claude Code on a Mac
- macOS requirements: what to check first
- Option 1. The Claude app and the Code tab
- Option 2. One command in Terminal
- Homebrew: who it suits
- Your first project: a service page in 20 minutes
- Mac install errors and how to fix them
- Updating and uninstalling
- The whole path in one minute
- Sources
Two ways to install Claude Code on a Mac
Claude Code is an assistant from Anthropic that works with the files on your own computer. You describe a task in plain words, and it opens the folder, reads your documents, creates new ones, builds pages, spreadsheets, and slide decks, and then checks its own work. I covered why it matters for people without a technical background in Claude Code for non-coders. This guide is only about the Mac. If you're on a PC, see Claude Code on Windows.
On a Mac, Terminal and the shell Claude Code needs are already built in, so there's nothing extra to install. You have three options, and two of them suit a beginner.
| Option | What you do | Who it's for | Updates |
|---|---|---|---|
| Claude app, Code tab | Download the .dmg, drag it to Applications, sign in | Anyone who has never opened Terminal | The app updates itself |
| Command in Terminal | Paste one line and press Return | Anyone who wants to run claude from any folder | Automatic, in the background |
| Homebrew | One brew command | People who already have Homebrew | Manual: brew upgrade |
If the word "Terminal" makes you nervous, start with the app: you pick the folder with the mouse and see every change clearly. Later, add the terminal version too. Both share settings and project memory in the same ~/.claude folder.
macOS requirements: what to check first
Five minutes of checking saves an hour of hunting for errors.
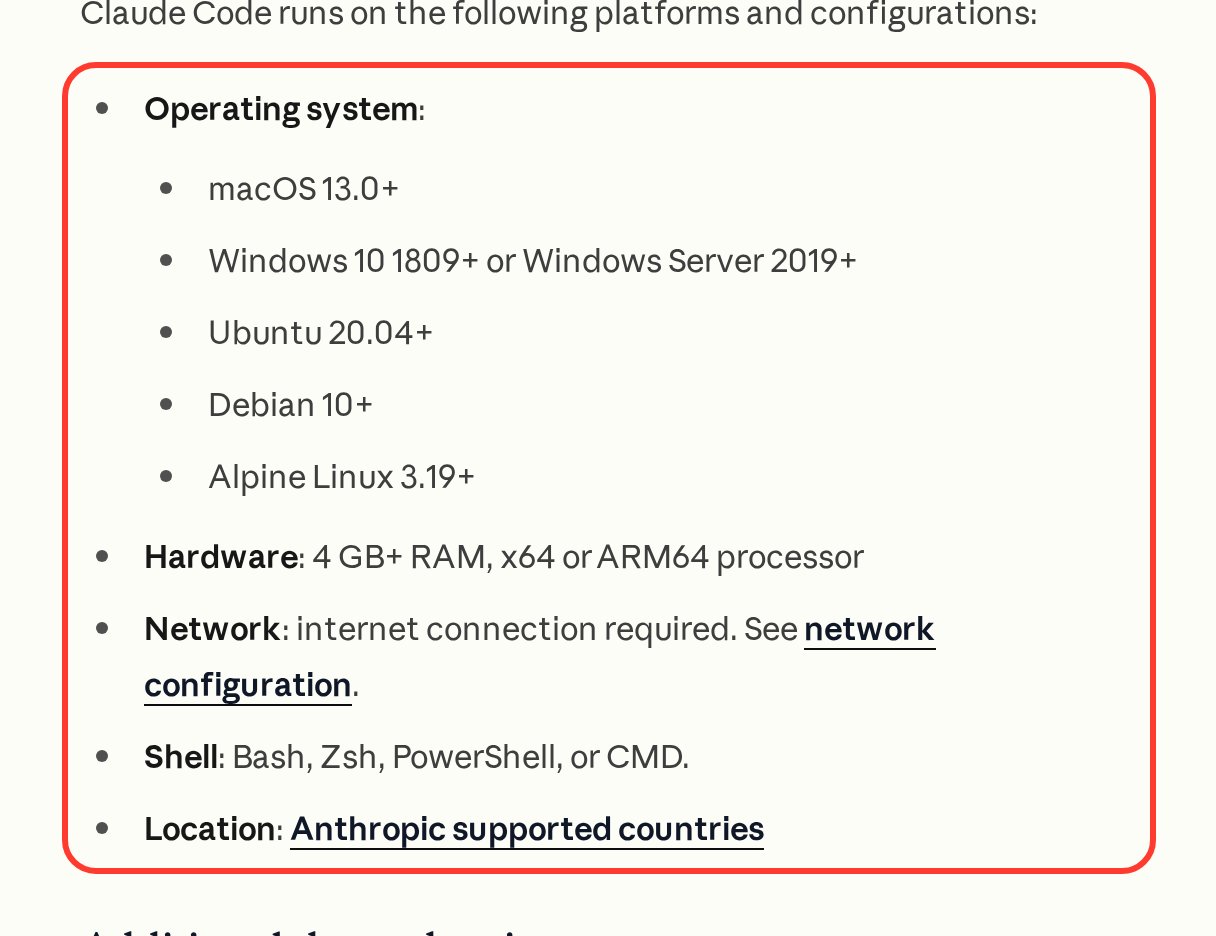
macOS 13 Ventura or newer
Open the Apple menu in the top-left corner and choose About This Mac. The window shows the name of your system and its version number. macOS 13 Ventura, 14 Sonoma, 15 Sequoia, and anything released later all work. On macOS 12 Monterey and older, Claude Code won't run: the installer finishes, but the program crashes with a dyld error.
Processor and memory
Both kinds of Mac work: Apple silicon (M1, M2, M3, M4, and newer) and older Intel models. The Claude app for Mac is a universal build, so one download runs on either. You need 4 GB of RAM or more, which every Mac from recent years has. Raw power doesn't matter: the thinking happens on Anthropic's servers.
Here are the official requirements from Anthropic's documentation: macOS 13.0 or newer, 4 GB of RAM, an x64 or ARM64 processor, and Zsh or Bash. Zsh has been the default Mac shell since 2019, so that's covered. The Location line means Claude Code works only in supported countries.
A paid Claude plan
The Free plan doesn't include Claude Code. You need Pro, Max, or Ultra. Prices are from the official pricing page on publication day.
| Plan | Price (claude.com/pricing, Nov 15, 2026) | Claude Code | Who it's for |
|---|---|---|---|
| Free | $0 | no | Trying out the regular chat |
| Pro | $20/mo ($17/mo billed annually) | yes | Getting started: a couple of tasks a day |
| Max | $100/mo | yes | Several hours of work every day |
| Ultra | $200/mo | yes | Lots of long tasks running in parallel |
Pro is enough to start. If you run out of usage by lunchtime, you can switch plans in your account settings in a couple of clicks. The differences in limits are covered in Claude pricing plans, and if your card gets declined, see how to pay for Claude.
An account at claude.ai
Sign up at claude.ai with your email, Google, or Apple account. Use the same email for the subscription and for signing in to Claude Code, so the paid plan is recognized right away.
A folder for your first project
In Finder, open Documents and create a folder called claude-start. Put a plain text file in it that describes your service: what you do, who it's for, what it costs, and how to book. Claude Code only sees the folder you open for it, so it's smart to run your first experiments where nothing is precious.
Option 1. The Claude app and the Code tab
I recommend this path to anyone who wants Claude Code to feel like a regular Mac program. The app has Claude Code built in, so you never open Terminal.
Download the app
Go to claude.com/download and download the macOS version, a .dmg file. One file works on both Apple silicon and Intel.
Drag it to Applications
Double-click the file and drag the Claude icon onto the Applications folder. If macOS warns that the app was downloaded from the internet, click Open: it's signed by Anthropic.
Sign in
Launch Claude through Spotlight (Cmd + Space, type Claude, Return) and sign in. Confirm the sign-in in the browser, and the app picks it up on its own.
Open the Code tab and your folder
The Code tab sits at the top of the left sidebar. In the bar under the input field, pick the top item in the Local group (your Mac), then click Open folder and choose claude-start. Leave the model on the default.
If the app asks you to subscribe instead of letting you work, you signed in with a Free account. If you see a 403 error, make sure your subscription is on the same email you signed in with and that you're in a supported country. Modes, project memory, and buttons work the same on Mac and Windows, and I cover them step by step in how to use Claude Code.
Option 2. One command in Terminal
Choose the terminal version if you want to type claude in any folder, work inside VS Code or Cursor, or run several projects at once. You paste one line, and no administrator password is needed: it installs into your home folder.
Open Terminal
Press Cmd + Space, type Terminal, and press Return. A window opens with a line like name@MacBook ~ %. The % at the end means Zsh is running, which is exactly what you want.
Paste the install command
Copy the line with the button on the right, paste it into Terminal with Cmd + V, and press Return.
curl -fsSL https://claude.ai/install.sh | bash
In a minute or two the program lands in ~/.local/bin and you see a success message. If a Setup notes block mentions PATH, see the errors section.
Open a new Terminal window
The old window doesn't see the new program. Press Cmd + N. Skipping this step is the most common reason people think the install failed.
Check the version
Run this command:
claude --version
A working install answers with a version number and "(Claude Code)". Here's the answer on our Linux server; a Mac shows the same format.

Launch and sign in
Go to your working folder and start Claude Code with two commands:
cd ~/Documents/claude-start
claude
On first launch, pick a color theme and sign in with your Claude subscription in the browser. When asked whether you trust this folder, say yes. The sign-in is saved. To leave, type /exit or press Ctrl + C twice.
Older guides use npm install -g @anthropic-ai/claude-code. That needs Node.js and often hits permission errors on a Mac. The Step 2 command needs neither Node.js nor Homebrew and updates itself.
Homebrew: who it suits
Homebrew is a popular package manager for the Mac. If you already have it (brew --version answers with a number), install Claude Code like this:
brew install --cask claude-code
Two quirks. First, this cask follows the stable channel, about a week behind the latest release and skipping versions with major bugs; for day-one updates there's claude-code@latest. Second, it doesn't update itself, so run brew upgrade claude-code every week or two. If Homebrew says the cask doesn't exist, run brew update and try again.
Don't install Homebrew just for Claude Code: the curl command is simpler and updates itself. And don't keep two installs side by side, or Terminal will start mixing up versions.
Your first project: a service page in 20 minutes
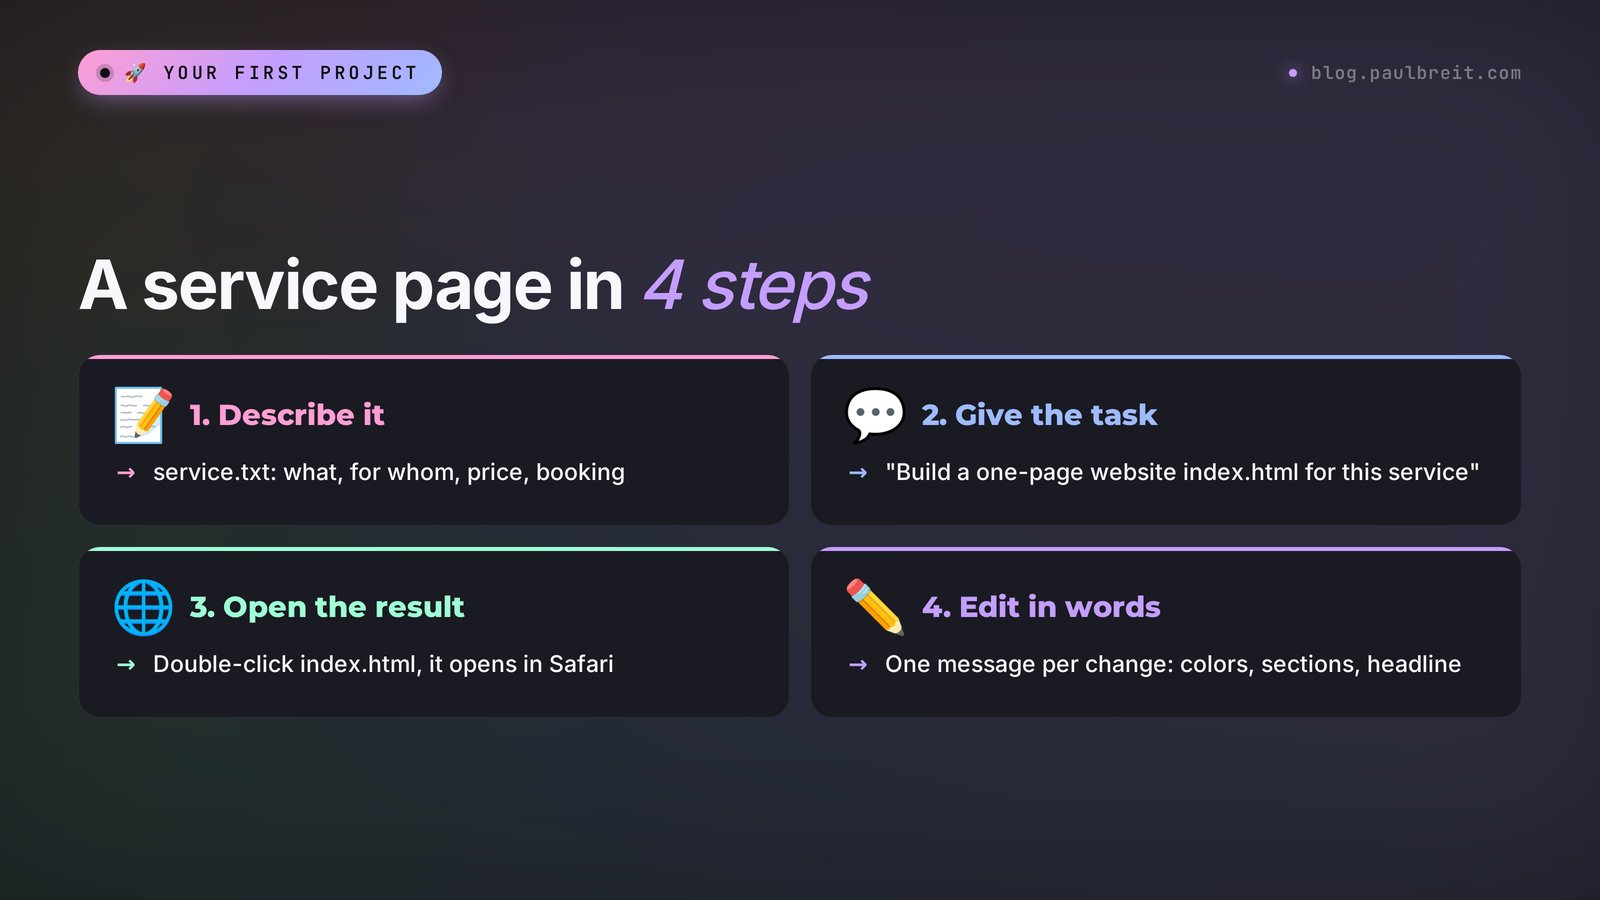
Installing is half the job. To see what Claude Code is worth, give it a task from your own work. A one-page website for your service is a great start: you see the result right away and can show it to a client.
Describe your service in a file
In the claude-start folder, create a file called service.txt in TextEdit (Format → Make Plain Text). Write 3 to 5 lines: who you are, what you do, who you help, your prices, and where to book. You can also paste those lines straight into your message to Claude and skip the file.
Give it the task
Open the folder in the Code tab, or run claude in Terminal from that folder. Paste this:
Read service.txt. Build a one-page website index.html for this service in this folder: headline, who it's for, pricing, booking button. Everything in one file, no external libraries. At the end, briefly tell me what you created.
Claude asks permission to create the file. Allow it. In the app, a counter with a plus sign appears next to the file: that's how many lines it wrote. Click it if you want to look at the code.
I ran this exact prompt in Claude Code 2.1.289 with the default model. The folder held a short description of a fictional therapist: online sessions for anxiety and burnout, a 50-minute session, a 5-session package, booking through Telegram. For this example, say $60 per session and $270 for the package. About a minute later, a 7 KB index.html appeared, and Claude reported: the page adapts to phones and has four blocks, a hero with a booking button, three "who it's for" cards, pricing, and a footer.
Claude worked out the per-session price inside the package on its own (here, $54) and said plainly that it had made up that figure and the card copy, since the file didn't contain them. It left out the therapist's experience and credentials, because the description had none.
Open the result
In Finder, double-click index.html and it opens in Safari. Or ask Claude: "open index.html in my browser." On a Mac it does this with the open command.
Edit in plain words
From here, talk to it the way you'd talk to a designer. One message per change.
Make the colors calmer, in a beige and green palette.
Add a "How a session works" section with three steps.
Rewrite the headline to be shorter and clearer, and suggest 3 options.
Check how the page looks on a phone and fix the spacing.
Note the report above: Claude flagged the copy it had invented. It usually does, but proofreading is still your job. Check prices, promises, and facts about yourself before anyone sees the page.
When you like the page, you can put it online. How to build a bigger site and publish it is covered in a website in one evening with Claude Code. And once your task list grows, Claude Code subagents help: separate helpers for separate jobs.
Mac install errors and how to fix them
Most install problems on a Mac come down to five messages. Find yours in the table.
| What your Mac says | Cause | What to do |
|---|---|---|
| zsh: command not found: claude | Terminal doesn't know about the ~/.local/bin folder | Open a new window. Still failing? Use the two commands below |
| zsh: permission denied: ~/.zshrc | Your Terminal settings file is write-protected | Run chmod u+w ~/.zshrc, then the two PATH commands again |
| dyld: Symbol not found or Abort trap: 6 | macOS older than 13 Ventura | Update macOS. If your Mac can't update, use Claude in the browser |
| curl: (22) ... error: 403 or App unavailable in region | The request comes from a country where Claude isn't available | Check the supported countries list; Claude Code works only there |
| Cask 'claude-code' is unavailable | Homebrew's package list is out of date | Run brew update, then install again |
The first error is the most common: the program is in place, but Terminal doesn't look in its folder. Two lines fix it for good. The first saves the setting for new windows, the second applies it now:
echo 'export PATH="$HOME/.local/bin:$PATH"' >> ~/.zshrc
source ~/.zshrc
Then run claude --version again. If you're using the terminal inside VS Code or Cursor, quit the editor completely and reopen it: it reads these settings at launch.
If your error isn't in the table, run claude doctor. It checks the install on its own and tells you what's wrong. If Claude Code installed fine but your account got blocked later, see Claude account suspended.
Don't install Claude Code with sudo, and don't give it your administrator password. The installer doesn't need admin rights. With sudo, the files end up owned by another user, and updates start failing with permission errors.
Updating and uninstalling
The Terminal version updates itself in the background. To get the latest version right now, run claude update. If there's nothing new, it tells you you're already on the latest version. The Homebrew version updates with brew upgrade claude-code. The Claude app updates itself and offers a restart.
To remove the Terminal version, run two commands:
rm -f ~/.local/bin/claude
rm -rf ~/.local/share/claude
For Homebrew: brew uninstall --cask claude-code. The app uninstalls like any other: drag it from Applications to the Trash. Your settings, memory, and conversation history stay in the ~/.claude folder. Delete it only if you're leaving for good, because all your settings go with it.
Everything Claude Code creates stays in your folder on your own drive, whatever happens to your subscription. To learn Claude in order, from your first chat to your own agents, start with Claude from scratch.
The whole path in one minute
macOS 13 or newer, a Pro plan for $20 a month, the app or one Terminal command, a version check, sign-in, and a first task that gives you a page for your service. Here's the whole guide as one list to copy.
Cheat sheet: Claude Code on Mac
1. Check: Apple menu → About This Mac → macOS 13 Ventura or newer.
2. Claude Pro, Max, or Ultra plan (Free has no Claude Code).
3. Same email for the subscription and for signing in.
4. No Terminal: claude.com/download → .dmg → drag to Applications → sign in → Code tab → Open folder.
5. With Terminal: Cmd + Space → Terminal → curl -fsSL https://claude.ai/install.sh | bash
6. New window (Cmd + N) → claude --version (you should see a version).
7. cd ~/Documents/claude-start → claude → sign in through the browser → trust the folder.
8. command not found: claude → echo 'export PATH="$HOME/.local/bin:$PATH"' >> ~/.zshrc and source ~/.zshrc
9. Something looks off → claude doctor. Update → claude update.
10. First task: "Read service.txt and build a one-page website index.html."
Sources
- Claude Code: Advanced setup – system requirements and install (Anthropic docs), checked Nov 15, 2026
- Claude Code: Troubleshoot installation and login (Anthropic docs), checked Nov 15, 2026
- Claude Code: Get started with the desktop app (Anthropic docs), checked Nov 15, 2026
- Claude pricing (official page), checked Nov 15, 2026
- Anthropic: supported countries and regions, checked Nov 15, 2026
- Homebrew: claude-code cask, checked Nov 15, 2026
Frequently asked questions
Can I use Claude Code on a Mac for free?
No. Claude Code is only available on paid plans: Pro at $20 a month, Max at $100, and Ultra at $200. On the Free plan, the Code tab asks you to subscribe, and the Terminal version won't let you sign in.
What macOS version do I need for Claude Code?
macOS 13 Ventura or newer. Check it in the Apple menu under About This Mac. On macOS 12 Monterey and older, the program crashes with a dyld error, and Homebrew won't fix that, because it downloads the same file.
Does Claude Code work on an Intel Mac?
Yes. The Terminal version supports both Apple silicon and Intel, and the Claude app for Mac is a universal build: one download works on any Mac running macOS 13 or newer.
Which is better for a beginner: the Claude app or Terminal?
The Claude app with the Code tab is easier for a beginner: you pick the folder with the mouse and see every change clearly. The Terminal version is useful if you want to run claude from any folder or work in an editor like VS Code. You can use both, and they share settings.
Why does it say command not found: claude after installing?
Terminal can't see the ~/.local/bin folder where the program was installed. Open a new Terminal window. If that doesn't help, add the folder to PATH with two commands: echo 'export PATH="$HOME/.local/bin:$PATH"' >> ~/.zshrc and source ~/.zshrc.
Do I need Homebrew or Node.js to install Claude Code?
No. The official command curl -fsSL https://claude.ai/install.sh | bash installs a ready-to-run program without Node.js or Homebrew. Homebrew is handy only if you already have it, and then you update Claude Code yourself with brew upgrade claude-code.