Nano Banana 2: How to Edit Photos With Google's AI
Nano Banana 2 is Google's AI model that changes the background, lighting, outfit, and details of your photo from one plain-English sentence, combines several shots into one image, and keeps a person's face recognizable from edit to edit. On October 6, 2026, Google shipped Nano Banana 2.1 with mask editing. Inside: how the versions differ, where the model works and what it costs, a step-by-step first edit, a prompt formula, and 24 ready prompts for portraits, products, covers, and old photos.
To edit a photo in Nano Banana 2, open the Gemini app or gemini.google.com, tap the plus or paperclip icon, upload your shot, and describe the edit in plain words: what to keep, what to change, and how it should look. For example: "Keep my face and pose unchanged, replace the background with a bright kitchen with a window on the left, 4:5 format." A free Gemini account gets up to 20 images a day, and the 2.1 update from October 6, 2026, edits a selected area more precisely and keeps a person's look intact. Write every follow-up edit in the same chat: the model remembers the previous image.
Everyone who sells services, courses, and consulting and is tired of hunting for a photographer for every post. A therapist needs a clean headshot and covers for live sessions. A nutritionist needs appetizing plate photos without a studio. A nail artist needs a clean background on shots of her work. A tutor needs lesson covers with a big headline. A marketplace seller needs ten product images from one shot taken on the kitchen table. All of it gets done in one chat in one evening.
What's inside
- What Nano Banana 2 is and where the name comes from
- Nano Banana, Pro, 2, and 2.1: the difference
- What's new in Nano Banana 2.1
- Where it works and what it costs
- Access in the US: plans and limits
- Your first photo edit: step by step
- The photo edit prompt formula
- Portraits and headshots: 6 prompts
- Products and still life: 5 prompts
- Background, light, and clutter: 5 prompts
- Covers and text on images: 4 prompts
- Old photos and composites: 4 prompts
- Precise edits with a mask
- A series of images with one character
- Nano Banana vs. other photo AI tools
- Limits, watermarks, and consent
- When something goes wrong
- A checklist for your first evening
- The whole path in a minute
Just two years ago, editing a photo looked like this: open Photoshop, spend half an hour tracing hair with the pen tool, then hunt for a background, then fiddle with the lighting so the person didn't look cut out of a magazine and pasted onto wallpaper. A good headshot or a cover for a live session cost you either a photographer's fee or an evening of frustration.
In the summer of 2025, Google put an unnamed model on a public AI comparison arena. It changed the background, outfit, and pose in a photo from a single sentence and kept the face recognizable. Users nicknamed it "nano banana," the images spread across social media, and Google eventually kept the name officially. The family now has four versions, and the latest, Nano Banana 2.1, came out last week.
Below is everything you need to get started: which version works where, what the free tier runs into, how to ask for an edit the right way, and 24 prompts you can copy and fill in with your own details. If you want the big picture of image AI in general, I have a separate overview of AI image generators. This piece focuses on one model and on editing your own photos.
Section 01What Nano Banana 2 is and where the name comes from
Nano Banana is the working nickname for Google's models that create and edit images. Their official names are long and dull: Gemini 2.5 Flash Image, Gemini 3 Pro Image, Gemini 3.1 Flash Image. You don't need to memorize them. Even Google itself writes "Nano Banana" in its apps and presentations.
The key difference from familiar image generators is that these models are built into Gemini, a large language model. An old-school generator took a description and drew a picture from scratch. Nano Banana first understands what's in your photo, what you're asking for, and how the world around it works, and only then draws. That's why it can do things that used to require a designer:
- change one detail in a photo and leave everything else alone: repaint a wall, remove a cable, swap a sweater;
- keep a person's face recognizable while the background, outfit, pose, and lighting change;
- build one scene out of several shots: you, your product, and a coffee shop interior;
- write readable text right on the image, including in other languages;
- hold a conversation: you ask for an edit, look at the result, ask for the next one, and the model remembers the previous step;
- draw on real-world knowledge: a diagram, an infographic, a map, the correct shape of an object.
Nano Banana 2 is the second version of the "fast" line. It runs at the speed of the lightweight Flash model, while its quality comes close to the bigger Pro. Since February 26, 2026, it's the model that draws images by default in the Gemini app whenever you ask it to "draw" something or upload a photo and ask for a change.
You don't need to pick a model from a menu. If you open Gemini and ask it to change a photo, Nano Banana 2, or already 2.1, does the work. A separate switch is only needed for the bigger Pro version, covered below.
Section 02Nano Banana, Pro, 2, and 2.1: the difference
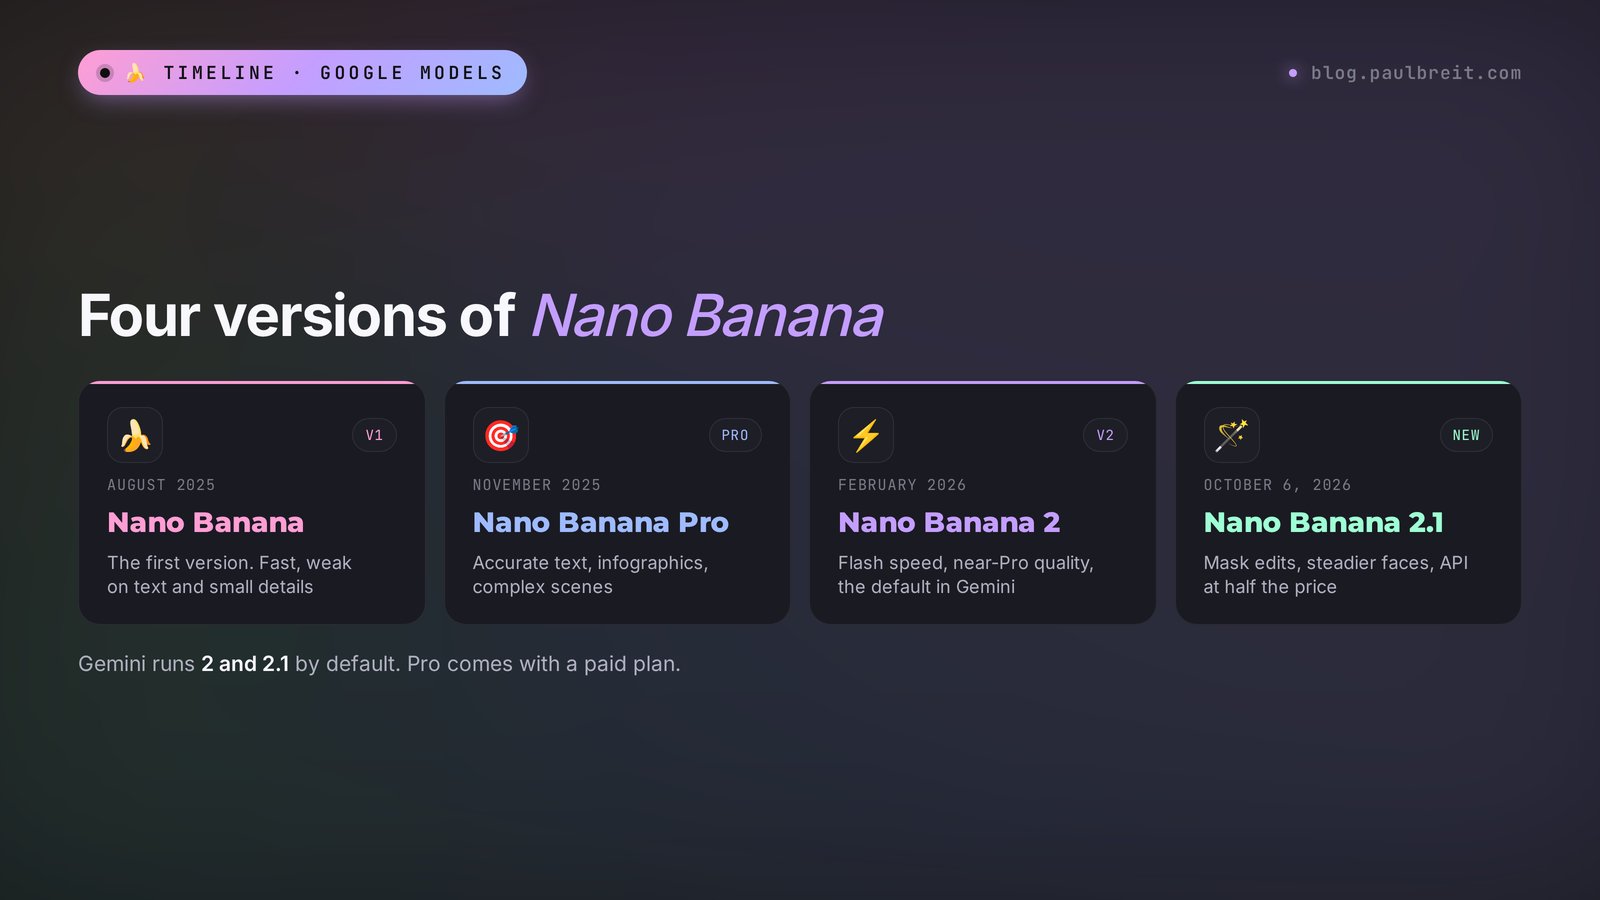
Confusing names are the first thing people trip over. Reviews say "Nano Banana," then "Pro," then "2," then "2.1," and it feels like four different services. In reality it's one line of models that has been updated roughly every three to four months.
| Version | Released | Strength | Where you'll find it |
|---|---|---|---|
| Nano Banana (Gemini 2.5 Flash Image) | August 2025 | The first model that held a face through edits. Fast, but weak on text and small details | Older third-party apps and bots; already replaced in Gemini |
| Nano Banana Pro (Gemini 3 Pro Image) | November 2025 | Accurate text, complex scenes, infographics, high resolution. Slower and pricier | In Gemini for AI Pro and Ultra subscribers via the menu, in AI Studio and the API |
| Nano Banana 2 (Gemini 3.1 Flash Image) | February 26, 2026 | Flash speed, near-Pro quality, up to 4K, up to 14 reference images per prompt | Default model in Gemini, in Google Search, AI Studio, the API |
| Nano Banana 2.1 | October 6, 2026 | Mask editing, steadier faces and objects between edits, cleaner composition, API at half the price | Rolling out in Gemini, AI Mode in Search, AI Studio, Flow, Stitch, Google Ads |
A simple rule of thumb. For 90% of tasks, whatever Gemini switches on by itself is enough: Nano Banana 2 or 2.1. Pro is worth calling in when you need a complex infographic with lots of text, a poster with several lines of copy, or an image where every tiny detail matters. For everyday photo edits, Pro is slower and burns a more expensive limit.
The 2.1 update doesn't reach everyone on the same day. Google rolls it out gradually, and subscribers get it first. If you're still on version 2, every prompt in this article works without changes: the difference is in precision, the prompting language is the same.
Section 03What's new in Nano Banana 2.1
Google named three headline improvements in version 2.1: visual design, mask editing, and character consistency. Here's what each one means in practice.
Mask editing
A mask is a selected area of the image that's allowed to change. Everything around it, the model has to leave as it was. Before, Nano Banana understood only words, and when asked to "swap the mug on the table," it would sometimes also nudge a hand, shift the shadows, or change the tablecloth color. In 2.1, the model understands boundaries better: you show where the edit goes, and it stays inside those limits. In its official model card, Google is upfront that instructions in mask edits aren't always followed completely yet, so you still need to check the result. I'll cover how to use this in practice in the mask section.
Character consistency
This is about the person on the tenth edit still being the same person as on the first. With version 2, a face would slowly "drift" from edit to edit: a slightly different nose, slightly different eyes, and by step five the image showed someone who merely looked similar. In 2.1, appearance, clothing, and objects hold noticeably steadier. If you make a series of covers or product images with one character, this is the most important upgrade.
Visual design
The model is better at arranging elements in the frame: where the headline goes, where the subject goes, where the breathing room is. Covers, banners, and infographics come out cleaner on the first try, and you have to ask "move the text" and "make it bigger" less often.
API pricing
For anyone who connects the model to their own software or uses third-party services built on it: an image of about 1,000 pixels per side costs around 3.4 cents in version 2.1, versus 6.7 cents in version 2. That changes nothing for a Gemini app user. But third-party services may get cheaper over time.
According to Google's model card: small text and long paragraphs on images come out poorly, character likeness holds well but not perfectly, and the model sometimes gets confused by volume and complex spatial arrangements of objects. Its knowledge of the world runs through March 2026. So long copy still goes into an editor on top of the image, and fresh logos or recent events shouldn't be drawn from memory.
Section 04Where it works and what it costs
Nano Banana doesn't have its own website with a banana on the homepage. The model lives inside Google's products, and each one has its own limits.
| Where | Who it's for | What it costs |
|---|---|---|
| Gemini app and website (gemini.google.com) | Everyone; the simplest path | Free with a daily limit, more on Google AI plans |
| AI Mode in Google Search | A quick image straight from search | Free |
| Google AI Studio (aistudio.google.com) | Anyone who wants more controls: aspect ratio, resolution, several variants | The interface is free; image generation needs a paid API key |
| Google Flow | Videos and storyboards that need frames with one character | With a Google AI plan |
| Gemini API and third-party services | Developers and reseller services | About 3.4 cents per 1K image on version 2.1, more for 2K and 4K |
Twenty images a day is more than it sounds. A headshot usually takes 3–5 edits, a live-session cover 2–4. If you work thoughtfully and write detailed prompts (how to write them is below), the free limit covers a couple of finished tasks a day.
Every edit is a new image and one less out of twenty. So don't write "a bit lighter," then "a bit more," then "no, put it back." Describe everything you want to change in one message. Three changes in one prompt cost the same as one.
Section 05Access in the US: plans and limits
Good news for US readers: there's nothing to work around. Every surface opens directly with a regular Google account: the Gemini app and website, AI Mode in Search, Google AI Studio, Flow, and the Gemini API. The only real question is which plan matches how much you edit.
| Plan | Price | Images per day in Gemini | Good for |
|---|---|---|---|
| Free | $0 | Up to 20 | Trying it out, a headshot or a cover a day |
| Google AI Plus | $4.99/month | 50 | Regular posts and stories |
| Google AI Pro | $19.99/month | 100 | Daily content plus access to Nano Banana Pro |
| Google AI Ultra | From $99.99/month | 1,000 | Agencies and heavy production |
| Gemini API | Pay per image | No daily cap from the plan | About $0.034 per 1K image on 2.1 vs. $0.067 on version 2 |
The numbers come from Google's help page for Nano Banana 2. Google changes them without big announcements, so if your limit runs out sooner than you counted, that's normal: the exact figure is always in the Gemini help center.
What else is worth knowing:
- Start free. For most people who sell services, the free 20 images a day are plenty for the first week. Upgrade when you actually hit the limit, not before.
- AI Pro is the sweet spot if you also want Nano Banana Pro for infographics and posters with lots of text.
- Third-party apps and bots that plug Nano Banana in through the API are everywhere. Check two things: which model version actually runs inside (often it's the first Nano Banana from 2025, marketed as "the latest"), and what the service says about storing your photos. Don't upload clients' personal photos to an app you know nothing about.
- Download the official app. In the App Store or Google Play, the developer should be Google LLC. Plenty of lookalike apps with "banana" in the name have nothing to do with Google.
Every prompt below is written so it also works in other AI tools with photo editing. Any modern model understands the "what to keep, what to change, how it should look" structure.
Section 06Your first photo edit: step by step
Let's walk the whole path with a simple example: you have a phone photo taken at home in front of a closet, and you need a proper headshot for your social profiles. The steps are the same on the web and in the app.
Open Gemini and sign in with your Google account
Go to gemini.google.com or get the Gemini app for Android or iPhone. Check the developer in the app store: it should say Google LLC. There are lots of apps with similar icons and "banana" in the name, and almost all of them are someone else's.
Prepare the source photo
The better the source, the better the result. The face should be in focus and in decent light, with no heavy filter. The shot shouldn't be compressed by a messenger app: send the original from your gallery. If the photo is dark and blurry, the AI fills in the details on its own, and the face starts to look slightly "not you."
Upload the photo to the chat
Tap the plus or paperclip icon next to the input field and pick the shot. If the menu has an image button or a "Create image" option, you can turn it on, but for editing an uploaded photo Gemini usually understands the task from your text.
Write the edit using the formula
First what to keep, then what to change, then how it should look and in what format. A sample headshot prompt is below, after the steps.
Judge the result with three questions
Do you recognize yourself? Any extra fingers, broken ears, odd folds in the clothes? Does the light on the face match the light in the background? If everything checks out, save it. If not, move to step 6.
Ask for a targeted fix in the same chat
Don't start over. Write exactly what to fix, and always repeat what to keep: "Don't change my face. Make the background a bit blurrier and the light on my face warmer." The model sees the previous image and edits it.
Download the full-size image
Tap the image and choose download. In the phone app, it's easier to open the image full screen and save it from there. Don't take a screenshot: the quality drops.
The prompt for this example:
This is my photo. Keep my face, hairstyle, facial expression, and body shape unchanged. I need to stay recognizable.
Replace the background with a bright minimalist studio: a warm gray-beige wall, slight blur.
Replace my clothes with a plain cream-colored shirt, no logos.
Light: soft, from a large window on the left, no harsh shadows on the face.
Chest-up framing, looking into the camera, square 1:1 format.
Here's what a real exchange looks like when the first attempt came out almost right:
You: [photo] Keep my face and hairstyle unchanged. Replace the background with a bright studio, the outfit with a plain cream shirt, soft light from the left, chest-up framing, 1:1 format.
Gemini: [image] Here's your portrait on a bright studio background in a cream-colored shirt.
You: Good. Don't touch the face or the shirt. The smile came out too wide, bring back the one from the original photo. And remove the shine on my forehead.
Gemini: [image] I restored your original smile and removed the shine; everything else is unchanged.
Notice that every message repeats what not to touch. That line works as insurance. The model redraws the image every time, and without that note it may "improve" something you were already happy with.
Section 07The photo edit prompt formula
Editing a photo has its own logic, different from a prompt where you ask for an image from scratch. When generating, you describe the whole scene. When editing, the scene already exists, and the model's job is to change exactly what's needed and nothing else.
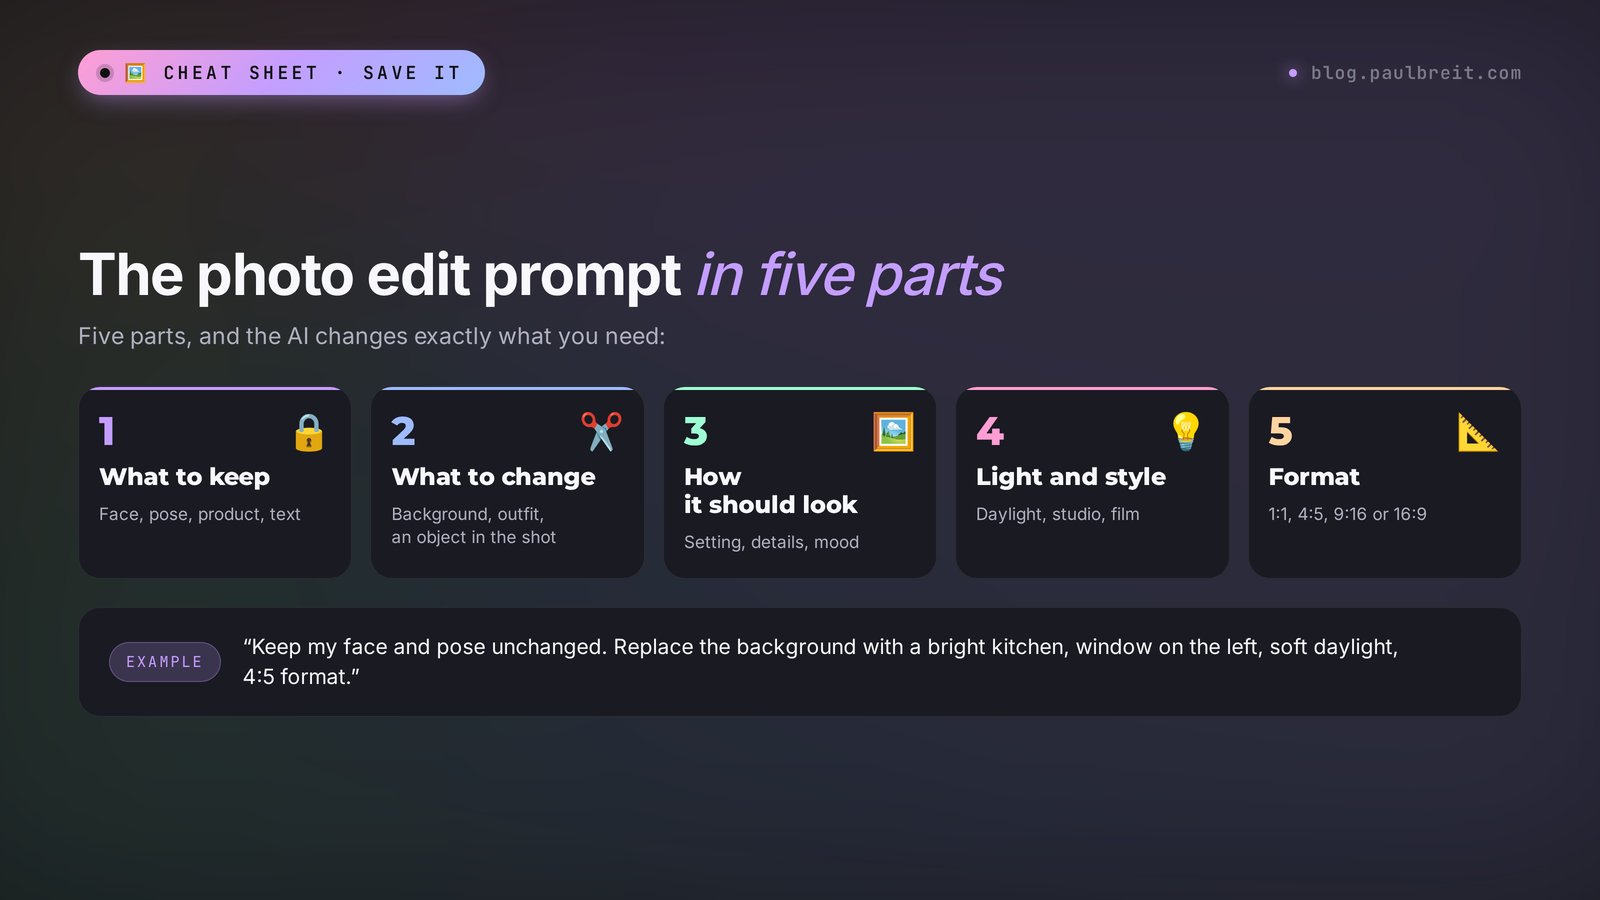
A working formula in five parts:
- What to keep. The face, the pose, the product, the text, the composition. Be specific: "my face and hairstyle," "the bottle shape and the label."
- What to change. One to three changes. More than three at once, and the model starts getting confused.
- How it should look. Colors, materials, setting. Instead of "make it nice," write "light wood, a linen napkin, a green eucalyptus sprig."
- Light and style. Where the light comes from, what it's like (soft, daylight, warm evening), and the style of the shot (magazine portrait, product photography, a candid phone photo).
- Format. 1:1 for a profile photo, 4:5 for a feed post, 9:16 for Stories and Reels, 16:9 for a live-session or YouTube cover, 3:4 for a marketplace listing.
A template to fill in with your details:
Keep unchanged: [what to keep].
Change: [what to change, one to three items].
It should look like this: [colors, materials, setting].
Light and style: [where the light comes from, what kind, style of the shot].
Format: [aspect ratio].
Five mistakes that ruin an edit
- Opinions instead of descriptions. The model interprets "make it stylish" its own way. "Beige tones, lots of breathing room, window light" is an actual task.
- No line about the face. Without it, the model sometimes "improves" your looks: smooths the skin, reshapes the nose.
- Too much at once. Background, outfit, pose, hairstyle, and text in one prompt nearly guarantees something slips. Two edits in a row work better.
- Long text on the image. The model will handle a five-word headline. A paragraph, no.
- A new chat for every edit. The model loses the history and you start from zero. Keep one task in one chat.
If you want to level up your prompts beyond images, take a look at the AI prompt library: ready-made commands for copy, sales, and content.
Section 08Portraits and headshots: 6 prompts
Portraits are the most common task and the fussiest: the eye instantly spots a face that's "off." Every prompt below starts with the same first line, and it's worth keeping.
1. A business headshot from a phone photo
Keep my face, hairstyle, and facial expression unchanged.
Replace the background with a bright office interior, heavily blurred.
Outfit: a navy blazer over a white T-shirt.
Light: soft daylight from the front left. Style: a business magazine portrait.
Waist-up framing, 4:5 format.
Who it's for: lawyers, accountants, financial advisors, business trainers. A blazer and an office read as reliability without a word.
2. A warm portrait for helping professions
Keep my face and features unchanged. I need to stay recognizable.
Place me in a cozy office: an armchair, bookshelves, a live plant, warm light from a desk lamp.
Outfit: a soft sweater in a muted green.
Expression: calm, with the same slight smile as in the original.
1:1 format, the style of a candid photo, no gloss.
Who it's for: therapists, coaches, family counselors. A glossy studio works worse here: people want to see a real person they won't be nervous to visit.
3. An "at work" portrait
Keep my face and hands unchanged.
Change the setting: I'm standing in a kitchen with a marble countertop, chopping vegetables, with a plate of salad and a glass of lemon water next to me.
Outfit: a light apron over a gray T-shirt.
Daylight from a window on the right. Style: a documentary shot, as if a photographer caught the moment.
4:5 format.
Who it's for: nutritionists, chefs, fitness trainers, any craftsperson. A portrait at work sells better than a portrait in a void: people see right away what you do.
4. A profile photo with a brand-color background
Keep my face, hairstyle, and outfit unchanged.
Carefully separate me from the background and replace it with a solid #E8DFF5 (soft lavender).
Add a light shadow behind my shoulders so it doesn't look like a cut-out.
Shoulders-up framing, face centered, 1:1 format.
You can set the color with a hex code, as in the example, or in words. If you have brand colors, one profile photo like this across all your social accounts makes you recognizable in the feed.
5. A seasonal look without losing the face
Keep my face and expression unchanged.
Move me onto a winter street: snow falling, blurred string lights and shop windows in the background.
Outfit: a warm camel coat and a knit scarf.
Light: evening, warm from the string lights, a little visible breath in the cold.
9:16 format for Stories.
Images like this work well in holiday greeting posts and seasonal promo announcements. More holiday ideas in the article AI photo prompt ideas.
6. Fixing small things on a good shot
This is a good photo. Keep everything as is: face, pose, outfit, background, light, colors.
Fix only three things:
1) remove the strand of hair falling over my left eye;
2) remove the glare on my glasses;
3) smooth out the crease on my shirt collar.
Change nothing else.
This is the most underrated use case. The shot is already good, it needs three small fixes, and instead of an hour in an editor it takes one sentence.
Section 09Products and still life: 5 prompts
For product photography, Nano Banana is handy because it keeps the product's shape and label and places it in any setting. One tip before you start: shoot the item on a plain background in daylight, straight on and without glare. The cleaner the source, the more accurately the model carries over the text on the label.
7. A product on a clean white background
Keep the product unchanged: shape, colors, label, and all text on it.
Remove the entire background and place the product on a clean white background.
Add a soft natural shadow under the product.
Product centered, filling 70% of the frame, 3:4 format.
Works for marketplace listings where the main image has to be on white. More on listings, descriptions, and infographics in the article AI for marketplace sellers.
8. A product in a lifestyle setting
Keep the jar of cream unchanged: shape, lid, label, and text.
Place it on a light travertine bathroom shelf, with a white towel, a eucalyptus sprig, and water droplets on the surface next to it.
Light: soft morning light from a window on the left. Style: product photography for a skincare brand.
4:5 format.
9. A series from a single shot
Keep the product in the photo unchanged. Make 4 different shots of it for a product listing, one at a time, starting with the first:
1) on a white background, front view;
2) in a person's hand, no jewelry, showing scale;
3) in the setting where it gets used;
4) a close-up showing the material's texture.
3:4 format for each shot.
After the first shot, type "next." That way the model keeps the product identical across the series, and the listing looks like one photo shoot.
10. A dish you want to eat
Keep the dish on the plate unchanged: ingredients, portion size, plating.
Improve the presentation: a dark wooden table, a linen napkin, a fork on the side, a blurred glass of water in the background.
Light: side light, warm, like a café in the evening. Make the colors richer but natural, nothing neon.
4:5 format, shot from a 45-degree angle.
For nutritionists, food bloggers, pastry chefs. One important caveat: the dish has to stay the same dish. If the AI adds something that wasn't on the plate and you publish it as your own, that's misleading your client.
11. Clothing on a model from a hanger shot
The photo shows a dress on a hanger. Keep the cut, color, fabric, buttons, and length of the dress exactly as in the shot.
Show this dress on a woman aged 30–35 with an average build, full length, taking a light step forward.
Background: a bright city street in summer, blurred.
Light: soft daylight. Style: a clothing catalog. 3:4 format.
A great trick for small boutiques and makers who sew to order. Before publishing, check the details against the original: the model sometimes changes the number of buttons or the sleeve length.
Section 10Background, light, and clutter: 5 prompts
These edits eat up most of a designer's time and take Nano Banana seconds. This is where the model is especially strong.
12. Remove something from the frame
Keep everything in the photo unchanged except one thing:
remove the person in the background on the right and the trash can behind them.
Fill that space with a continuation of the street so there are no visible traces of the edit.
13. Fix the light on a dark shot
Keep the people, their faces, poses, and the setting unchanged.
Fix the lighting: the photo was taken in the evening and came out dark and yellow.
Make the light look like natural daylight, faces well lit, natural skin tones, no blown-out highlights.
Don't add or remove anything.
14. Change the season or the weather
Keep the house, the trees, the path, and the composition unchanged.
Change the season to golden autumn: yellow-orange leaves, some of them on the grass, low warm sunlight.
Same format as the original.
Handy for realtors, guesthouses, and vacation rentals: one photo of a property turns into a seasonal set. And again, about honesty: if you show a client how a property looks in the fall, label it as a visualization.
15. Extend the frame for another format
Keep everything in the photo unchanged.
Extend the frame on both sides to a 16:9 format: continue the interior on the left and right in the same style, lighting, and perspective.
The person stays in the right third of the frame, with empty space on the left for a headline.
A lifesaver when you have a great vertical photo but need a horizontal cover for a live session or YouTube.
16. Recolor one object
Keep everything in the photo unchanged.
Recolor only the sofa: it's gray now, make it dark green velvet.
The folds, shadows, and cushions should stay as in the original.
For interior designers and furniture makers, it's a way to show a client an option before the fabric is ordered.
Section 11Covers and text on images: 4 prompts
Nano Banana 2 writes text on images noticeably better than older generators. The rule that works: keep the text short, put it in quotes, and ideally spell out the font, color, and position.
17. A live-session cover with your photo
Keep my face unchanged.
Make a cover for a livestream, 16:9 format.
I'm on the right, chest-up, looking into the camera, slight smile.
Background: deep blue with a soft backlight.
On the left, a large headline in bold white letters on two lines: "How to Find Clients".
Below it, a small tag: "Live Thursday, 7 PM".
No other text on the image.
18. A cover for a lesson or how-to post
Make a cover for a post, 4:5 format.
Large, centered, in a black bold sans-serif font, the text: "5 Resume Mistakes".
Plain light-yellow background. Bottom right: an illustration of a crumpled sheet of paper with red marks.
Simple, clean style, like business magazine covers.
19. An infographic from your key points
Make a simple infographic, 4:5 format, light background, dark text.
Headline: "How a Consultation Works".
Four steps from top to bottom, each with an icon and a one-line caption:
1. "Request"
2. "15-minute intro call"
3. "Situation review"
4. "One-month plan"
Sans-serif font, everything large and readable on a phone.
If your infographic has more than 6–8 lines of text, switch to Nano Banana Pro (if you have a plan that includes it) or put the text on top of the image in an editor. Versions 2 and 2.1 still garble long copy.
20. Translate the text on an image
Keep the design, colors, layout, and font unchanged.
Translate all the text on the image from English into Spanish.
If the Spanish version is longer, reduce the font size so the text fits in the same blocks.
Useful when you like a template in another language, or when you make the same materials in two languages.
Section 12Old photos and composites: 4 prompts
These tasks aren't always about business, but they're the ones that most often turn a first try of Nano Banana into a "wow." They also make great content: stories about family photos get a response in any niche.
21. Restoring an old photo
This is an old family photo. Keep the faces, poses, clothing, and composition unchanged.
Remove scratches, stains, creases, and dust.
Restore sharpness, but don't make the skin look plastic.
Keep the photo black and white.
22. Colorizing a black-and-white photo
Keep the faces, poses, and setting unchanged.
Colorize the photo in natural colors typical of the 1970s: muted tones, a warm film palette.
Natural skin tone, no bright blush.
Remember that the model guesses the colors. If Grandma's dress was blue and the AI made it burgundy, correct that in the next edit.
23. Combine several photos into one scene
I'm attaching three photos: me (the first), my colleague (the second), and a coffee shop interior (the third).
Keep both people's faces unchanged.
Place us at a table in this coffee shop: we're sitting across from each other, with a laptop and two cups of coffee on the table, talking.
Light from the coffee shop window. Style: a candid documentary shot. 16:9 format.
Nano Banana 2 accepts up to 14 reference images in one prompt. In practice, 2–5 works best: with more, the model starts mixing up details.
24. Transfer the style of one image to another
The first image is my photo, the second is a style reference.
Keep my face, pose, and composition from the first photo.
Apply the color palette, lighting, and mood of the second image to it.
Same format as the first photo.
This is how you build a consistent visual style for your blog: take one reference image and run all your photos through it. On turning this into a viral format, there's a separate article on viral AI photos.
Section 13Precise edits with a mask
The mask is the headline feature of 2.1, so it gets more detail. The idea is simple: you mark an area, and the edit happens only inside it. The model leaves everything else as it was, down to folds and highlights.
How you mark the area depends on where you're working:
- In tools that have a brush or a selection (some Google products and third-party editors built on Nano Banana), you paint over the area and write what to do with it.
- In a regular Gemini chat, if you don't have a selection tool, you describe the area with words and landmarks. Model 2.1 understands these directions noticeably more accurately than the previous version.
- With a mark on the image itself. Circle the spot in a bright color in any phone photo editor, upload it, and write: "Change only the area circled in red, and remove the circle itself."
How to describe the area in words so the model hits it:
Keep everything in the photo unchanged.
Change only the upper left part of the wall above the sofa, between the window and the floor lamp:
hang a painting there in a thin light frame, an abstract watercolor in beige and light blue tones.
Don't touch the sofa, floor lamp, window, light, or shadows.
Three techniques that improve accuracy:
- Anchor it to neighbors. "Between the window and the floor lamp," "above the left shoulder," "on the table to the right of the laptop." Landmarks work better than "at the top" or "on the side."
- A do-not-touch list. List the objects next to the area that must not change. Those are exactly what the model hits most often.
- One area at a time. Two masks in one prompt invite mistakes. Make an edit, check it, then do the next.
Even with 2.1, the edit boundary sometimes shows: slightly different noise, a color shift, a cut-off shadow. Zoom in and look at the edges of the area. If the seam is visible, ask: "Make the transition at the edge of the edit seamless, matching the rest of the photo in light and grain."
Section 14A series of images with one character
If you run a blog, you need dozens of images in one style: post covers, Stories, announcements. AI used to draw a new person every time. Nano Banana 2 holds up to five characters in one series, and version 2.1 does it noticeably more consistently.
How to build a series where you stay yourself in every image:
Provide three good photos of your face
Straight on, three-quarter view, and smiling. Good light, no filters, no glasses unless you usually wear them. This is your "passport" for the model.
Set the series rules in one message
Describe the style, colors, format, and what must repeat in every image. The prompt is below.
Ask for images one at a time in the same chat
Each new one in a short line: "Next: me on a walk in the park, talking on the phone." The model holds the rules from the first message.
Bring back the reference if the face drifts
Around image 8–10, the likeness can weaken. Write: "Compare the face to the first photo I sent and restore the likeness." Or start a new chat with the same three photos and rules.
I'm attaching three photos of myself. This is the main character of the series; the face, hairstyle, and build must be the same in every image.
Series rules:
- style: candid photography, soft daylight, no gloss;
- palette: beige, warm white, muted green;
- 4:5 format;
- in every image I'm doing something, no posed shots.
Confirm you understand the rules and make the first image: I'm writing in a notebook at a table by the window, with a cup of tea next to me.
Ten images like this cover a month of posts visually. If you want to bring them to life and make a video, see the articles on how to animate a photo with AI and AI video from text.
Section 15Nano Banana vs. other photo AI tools
Nano Banana is a strong editing tool, but not the only one. A short comparison for the tasks our clients tackle most often:
| Tool | Strong at | Weaker at |
|---|---|---|
| Nano Banana 2 / 2.1 | Editing your photo from a sentence, keeping the face, combining several shots, speed | Long text, small lettering |
| Nano Banana Pro | Infographics, posters with text, complex scenes | Slower; in Gemini only on paid plans |
| ChatGPT image generation | Illustrations, stylized images, following long instructions | Keeping a face through a series of edits |
| Midjourney | Artistic images, aesthetics, atmosphere | Precise edits of a specific photo |
| Adobe Firefly | Generative fill inside Adobe tools, commercially focused output | Keeping your own face consistent across a series |
| Qwen | Images, editing from a sentence, text on images, free | Sometimes takes the prompt too literally |
My recommendation is simple. For editing your own photos, where staying yourself matters, Nano Banana is among the best right now. For an artistic image "from scratch," Midjourney or ChatGPT is more convenient. If you already live in Photoshop, Firefly's generative fill is the closest at hand, and Qwen is a free second opinion that understands the same prompts. A roundup of everything you can try without paying is in free AI tools, and the best tools for 12 tasks are collected in the best AI tools of 2026.
Section 16Limits, watermarks, and consent
The invisible watermark and the badge
Every Nano Banana image gets an invisible SynthID digital watermark and C2PA provenance data. They make it possible to tell that an image was created or edited by AI. On the free Gemini tier, a small visible badge also appears in the corner of the image. Technically you can crop it, but the SynthID watermark stays inside the image itself.
What the model won't do
Google restricts edits to photos of famous people, explicit and violent scenes, and forged documents. For some requests involving real people, the model will refuse or produce an image without the likeness. That's the safety rules at work, and a calm rewording usually helps.
Other people's faces and consent
Only upload and edit photos of other people with their consent. A client's "before and after," a colleague on a shared cover, a child in a family collage: ask first. In advertising, it's also a legal matter: in the US, using someone's likeness to promote a business without permission can violate their right of publicity, so get written consent for anything commercial.
Honesty with your clients
A generated plate of food, an "enhanced" result from an aesthetician, or an interior that doesn't exist in your portfolio is a direct path to disappointed clients and bad reviews. The rule I use myself: AI improves the presentation, while the result itself stays real. Light, background, cropping, cleanup: yes. A result of work that never happened: no.
Section 17When something goes wrong
| What happened | Why | What to do |
|---|---|---|
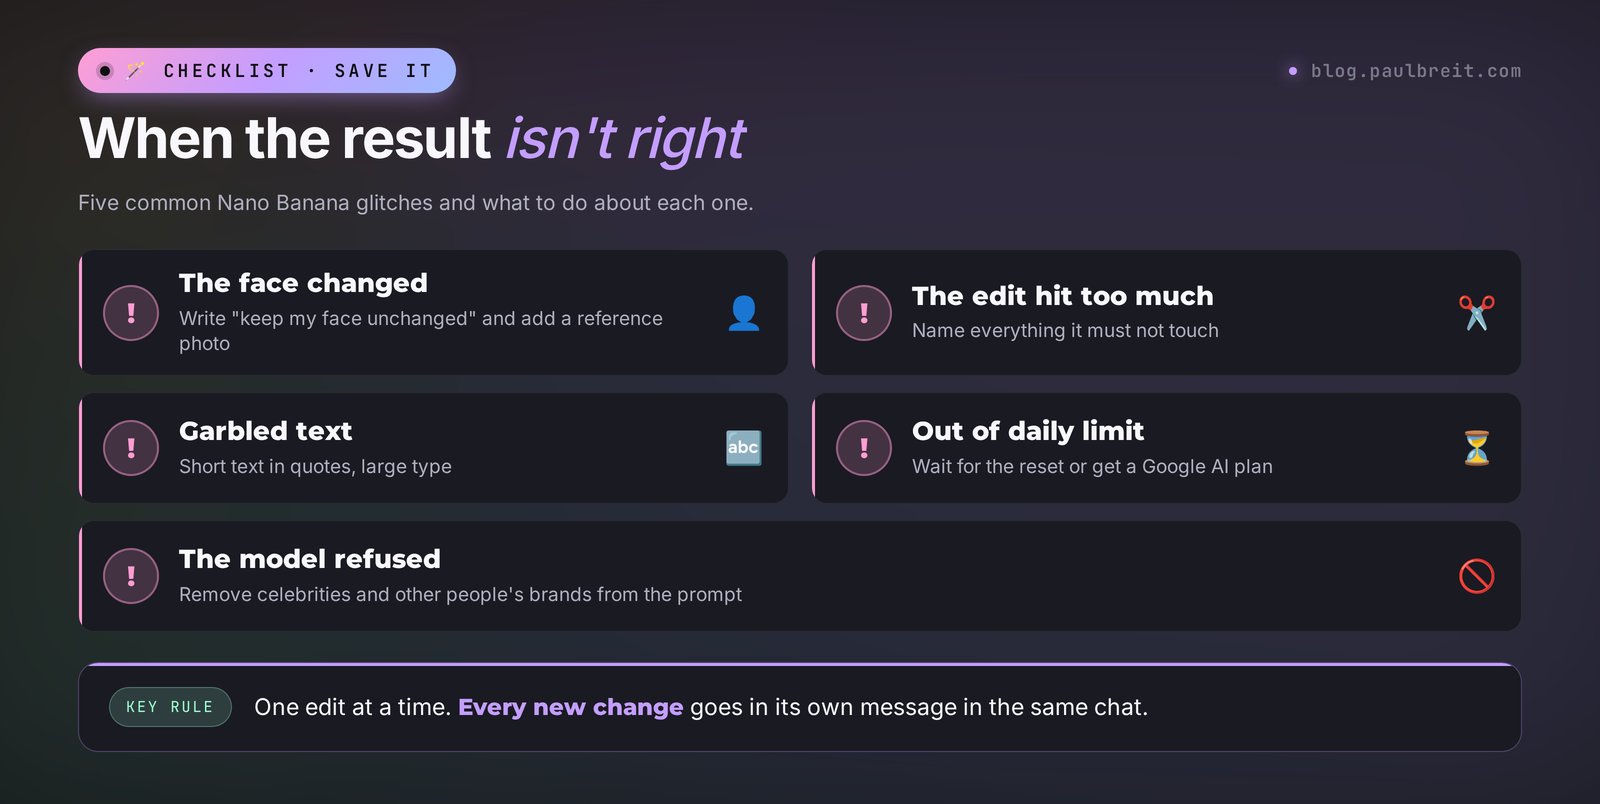
| The face doesn't look like you | No line about the face, or the source is dark and blurry | Start the prompt with "Keep my face unchanged," upload a sharp photo, add a second face photo as a reference |
| The edit touched things you didn't ask for | The model redrew the whole frame | List what not to touch, and make one edit at a time |
| Letters are garbled or misspelled | The text is long or small | Cut it to 3–6 words, put it in quotes, specify "large, bold sans-serif font" |
| Gemini drew a new image instead of editing | It didn't understand the photo needed changing | Start with "This is my photo, change…" and check that the shot is attached |
| It says it can't complete the request | Safety rules kicked in: a famous person, someone else's brand, an explicit scene | Remove celebrity names and logos, rephrase neutrally |
| You ran out of your limit | The free tier gives about 20 images a day | Wait for the reset the next day or get a Google AI plan |
| The image is small and blurry | You downloaded the preview or took a screenshot | Open the full image and download the original. For print, ask for "high resolution, 4K" in AI Studio |
| Body proportions look odd | The model misread the pose in the source | Ask to "keep the pose and proportions as in the original photo," pick a shot where the whole body is visible |
| Image tools don't show up in Gemini | A work or school account with features turned off, or the update hasn't reached you yet | Try a personal Google account, update the app, or use AI Studio in the meantime |
Section 18A checklist for your first evening
So your first try doesn't turn into endless experimenting, here's a plan for one evening. Two hours from now, you'll have visuals for a couple of weeks.
- Open Gemini and check that photo upload and editing work.
- Pick your three best photos: straight on, three-quarter view, at work. No filters, good light.
- Make a headshot with prompt #1, #2, or #4. Put it on all your social and messaging profiles.
- Make an "at work" portrait with prompt #3 for an intro post.
- Take one photo of your product or a result of your work and make two versions with prompts #7 and #8.
- Make a cover for your next live session or post with prompt #17 or #18.
- Set the series rules from Section 14 and make five images of yourself for future posts.
- Save the prompts that worked in your notes: next time you'll just swap in new details.
- Check every image zoomed in: hands, eyes, edit edges, text.
- Put the finished images in one dated folder so you don't have to dig through chats.
Section 19The whole path in a minute
- Nano Banana 2 is Google's model for editing and creating images, the default in Gemini. The 2.1 update from October 6, 2026, edits a selected area more precisely and holds the face.
- About 20 images a day for free, 50 to 1,000 on paid plans from $4.99 a month.
- In the US, everything works directly: the Gemini app, AI Mode in Search, AI Studio, Flow, and the API.
- The edit formula: what to keep, what to change, how it should look, light and style, format.
- Always make the first line: "Keep my face unchanged."
- One task, one chat. One edit at a time if it's complex.
- Text on the image: up to 6 words, in quotes, large.
- Improve the presentation and keep the result real: light and background are fine, an invented result is not.
FAQFrequently asked questions
Is Nano Banana 2 free?
Yes. In the Gemini app and on the web, a free account can create and edit images with a daily limit. Per Google's help page for Nano Banana 2, that's up to 20 images a day. Google AI Plus, Pro, and Ultra raise the limit to 50, 100, and 1,000 images a day. Image generation through the API and in Google AI Studio is paid.
How is Nano Banana 2.1 different from Nano Banana 2?
Version 2.1 came out on October 6, 2026. It edits a selected area of the image more precisely without touching the rest, holds faces and objects steadier from edit to edit, and lays out elements in covers and infographics more cleanly. An image through the API costs half as much. The prompts are the same for both versions.
How do I edit a photo in Nano Banana?
Open Gemini, tap the plus or paperclip icon, upload your photo, and describe the edit in plain words. Use the formula: what to keep unchanged, what to change, how it should look, what light and style, what format. Write follow-up edits in the same chat: the model remembers the previous image.
Does Nano Banana work in the US, and how much do the plans cost?
Yes, everything works directly in the US: the Gemini app, AI Mode in Search, Google AI Studio, Flow, and the Gemini API. Google AI Plus costs $4.99 a month, AI Pro $19.99, and AI Ultra starts at $99.99. Through the API, a 1K image on version 2.1 costs about $0.034 versus $0.067 on version 2.
How do I stop Nano Banana from changing my face?
Start every prompt with the line "Keep my face, hairstyle, and facial expression unchanged." Upload a sharp photo in good light with no filters. For a series of images, provide three face photos from different angles. If the likeness drifts, ask the model to compare the face to the first photo, or start a new chat with the same references.
Can Nano Banana write text on an image?
Yes, Nano Banana 2 handles short text well, including in other languages. Keep the text to 3–6 words, put it in quotes, and specify the font, color, and position on the image. The model still garbles long paragraphs and small text; for text-heavy infographics, Nano Banana Pro is the better fit.
How many photos can I upload in one prompt?
Nano Banana 2 accepts up to 14 reference images in one prompt and holds up to five characters in a series. In practice, 2–5 photos give the best result: for example, your photo, a product photo, and an interior shot. The more references you add, the more often the model mixes up details.
Can people tell an image was made with AI?
Every Nano Banana image gets an invisible SynthID watermark and C2PA provenance data, which can be used to verify that the image was created or edited by AI. On the free Gemini tier, there's also a small visible badge in the corner.
How is Nano Banana Pro different from Nano Banana 2?
Pro is the bigger, slower model. It handles long text, infographics, and complex scenes better. Nano Banana 2 is faster and gives comparable quality for everyday photo edits. In Gemini, Pro is available to AI Pro and Ultra subscribers through a separate menu.